
To fix mushy stops on your scooter, start by inspecting the brake pads for wear and ensuring they’re not too thin. Check the brake cable tension—tighten the cable using the barrel adjuster until your brake lever feels firm and responsive. Test the brakes, making sure they engage within a few millimeters of lever pull. If you want to master quick, effective adjustments and keep your scooter stopping safely, keep going for more tips.
Key Takeaways
- Check brake pad thickness and replace if less than 1-2 mm to restore responsiveness.
- Inspect brake cable tension; tighten using the barrel adjuster for quicker stops.
- Ensure brake lever feels firm with minimal travel; adjust cable tension if it feels mushy.
- Test brake response after adjustments to confirm quick engagement within a few millimeters of lever pull.
- Regularly inspect brake components for damage or wear to prevent mushy stops and ensure safety.
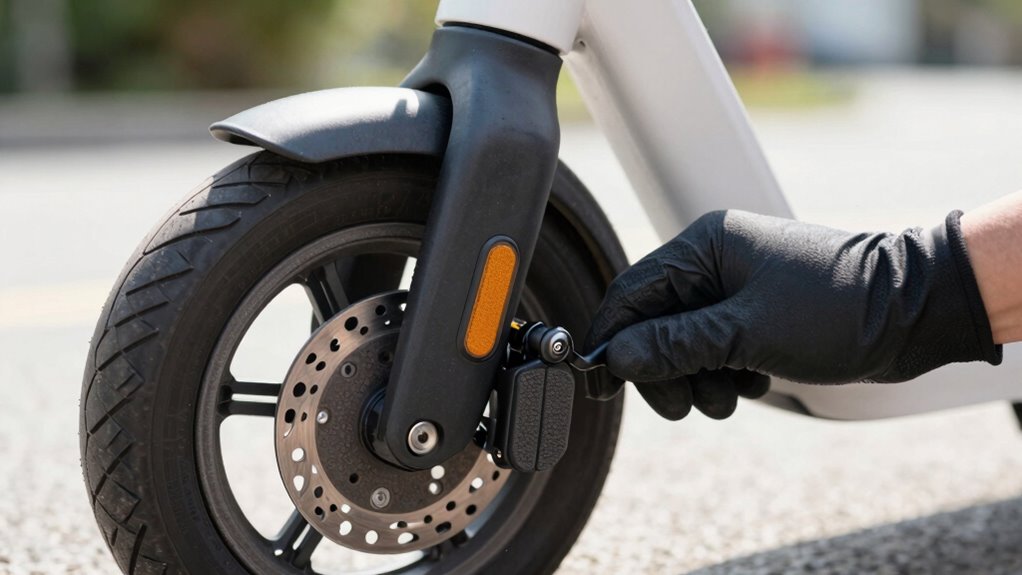
Have you ever noticed your scooter’s brakes feeling less responsive or squeaking during stops? If so, it’s a good sign that something needs your attention. One common cause is brake pad wear. Over time, the brake pads can become thin or uneven, reducing their ability to grip the wheel effectively. When brake pads wear down, you might experience a mushy or less precise braking feel. Fortunately, checking for brake pad wear is straightforward. You can remove the wheel cover or inspect through the brake caliper to see how thick the pads are. If they’re too thin—usually less than a millimeter or two—it’s time to replace them to restore proper stopping power.
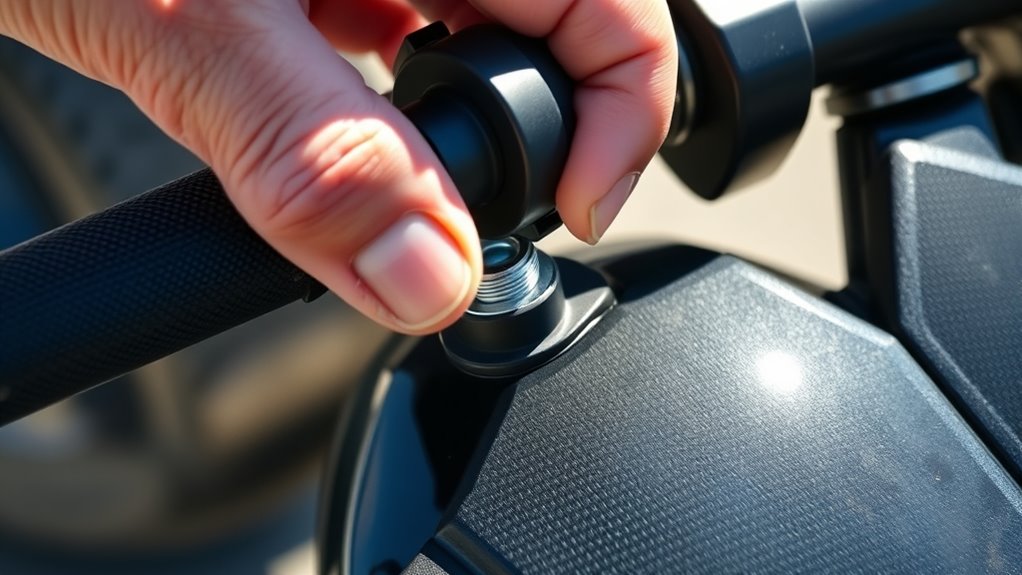
Alongside brake pad wear, another essential step is cable tension adjustment. Many scooters rely on a cable-operated brake system, so if the cable is too loose, your brakes won’t engage properly. Conversely, if it’s too tight, it can cause unnecessary wear or even damage the brake components. To check the cable tension, start by squeezing the brake lever. It should feel firm but not overly tight. If you notice the lever pulls all the way to the handlebar without much resistance or if the brakes don’t engage immediately, the cable likely needs adjustment. Most scooters have an adjustment screw or barrel nut near the brake caliper or along the cable housing. Loosen or tighten this to achieve the right tension—generally, the brake should engage within a few millimeters of lever pull and offer firm resistance when applied.
Adjusting the cable tension is often a quick fix. Loosen the lock nut, turn the barrel adjuster slightly, then test the brakes. When you’re satisfied with the feel—meaning the brake engages promptly without excess lever travel—tighten the lock nut again to keep the tension steady. Remember, if the brake feels too tight or too loose even after adjustment, it might be time to check the cable for fraying or damage and replace it if necessary. Proper cable tension not only improves your braking response but also extends the lifespan of your brake pads and calipers. Additionally, inspecting the brake components regularly can help identify issues before they lead to mushy stops or failure, enhancing your safety.
Regularly inspecting your brake pads and maintaining the correct cable tension are simple yet essential steps to ensure safe, reliable stops. Staying on top of these checks helps prevent mushy, ineffective braking and keeps your rides smooth. So, next time you notice sluggish stopping or squeaks, take a moment to examine your brake pad wear and adjust cable tension—you’ll be glad you did when you can stop quickly and confidently.
Frequently Asked Questions
How Often Should I Check My Scooter Brakes?
You should check your scooter brakes at least once a month to make sure safety. During your check, inspect the brake pad replacement needs and ensure the brake fluid level is adequate. If you notice mushy stops or reduced responsiveness, it’s time to replace the brake pads or top off the brake fluid. Regular inspections prevent issues and keep your scooter braking smoothly and reliably.
Can I Adjust the Brakes Without Professional Tools?
Yes, you can adjust your scooter brakes without professional tools. Start by inspecting the brake pads and replacing them if they’re worn. Then, check the caliper alignment to ensure it’s centered over the wheel. Use a screwdriver or pliers if needed to tighten or loosen the adjustment screws. Properly aligned calipers and fresh brake pads help you achieve responsive stops, making your ride safer and more reliable.
What Signs Indicate Brake System Failure?
Your brake system signals trouble when you notice a soft, spongey feel, as if the brakes are drowning in fog. Watch for signs like a spongy pedal, increased stopping distance, or unusual noises. Check brake fluid levels regularly, and if pads wear down or fluid becomes dark and dirty, it’s a clear sign your brakes are crying out for attention. Prompt action keeps your ride safe and smooth.
Are There Different Brake Types Requiring Unique Adjustments?
Yes, different brake types like disc brakes and drum brakes require unique adjustments. Disc brakes typically need you to check caliper alignment and pad clearance, while drum brakes often involve adjusting the star wheel for proper tension. Understanding these disc brake differences helps you make accurate adjustments, ensuring your scooter stops effectively. Always refer to your scooter’s manual for specific instructions, and regularly inspect your brakes for ideal performance.
How Long Does a Typical Brake Adjustment Take?
Think of adjusting your scooter brakes like tuning a guitar; it’s quick and straightforward. Typically, it takes about 15-30 minutes, depending on your experience. You’ll want to check the brake fluid and replace brake pads if they’re worn. An easy, step-by-step process guarantees your stops are sharp. Keep a wrench handy, and you’ll have your scooter riding smoothly in no time, with safer, more responsive brakes.
Conclusion
Remember, keeping your scooter brakes properly adjusted isn’t just about smooth stops; it’s about your safety and confidence every time you ride. Even if it seems like a minor tweak, taking a few minutes to check and adjust can prevent accidents and extend your scooter’s lifespan. Don’t overlook this simple maintenance step—trust me, the peace of mind knowing your brakes are reliable is worth it. Stay safe, stay confident, and enjoy your rides to the fullest.