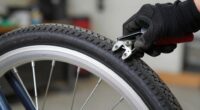
To make certain your patch holds, start by thoroughly cleaning and drying the damaged area, which prevents leaks. Cut a patch slightly larger than the tear and apply a thin, even layer of adhesive to both the patch and tube, avoiding air bubbles. Press the patch firmly in place and hold for a few minutes, then let it dry completely without disturbance. Finally, slowly inflate the tube and listen for leaks—if you keep going, you’ll discover more tips for a lasting fix.
Key Takeaways
- Properly clean and dry the damaged area to ensure optimal adhesion and prevent leaks.
- Cut the patch slightly larger than the tear to ensure full coverage and a secure fit.
- Apply a thin, even layer of adhesive on both the patch and tube surface, avoiding air bubbles.
- Press the patch firmly and hold for a few minutes to promote strong bonding.
- Allow sufficient drying time before inflating and testing for leaks to confirm a durable repair.

Have you ever faced a leaky or damaged tube that needs quick fixing? When it comes to repairing tubes—whether for your bicycle, pool, or air mattress—you might consider a DIY repair to save time and money. However, jumping into a repair without proper knowledge can lead to common mistakes that compromise the fix. Understanding the basics of a proper tube patch can help you avoid these pitfalls and ensure a lasting repair.
DIY tube repairs can save money, but proper prep and patience ensure a lasting fix.
The first step is to thoroughly clean the damaged area. Use a rough cloth or sandpaper to remove dirt, grease, and loose material around the tear. This step might seem simple, but skipping it is one of the most common mistakes people make. A dirty surface prevents the patch from adhering properly, increasing the risk of leaks later. Once the area is clean, dry it completely. Moisture, even in small amounts, can weaken the adhesive bond, so take your time to ensure it’s dry.
Next, carefully cut the patch to size, making sure it’s slightly larger than the tear. Rushing through this step is another frequent mistake in DIY repairs. A patch that’s too small won’t fully cover the damage, while a patch that’s too large can create unnecessary bulges that might catch on things or cause uneven wear. When applying the patch, follow the adhesive instructions precisely. Most patches require a thin layer of glue on both the patch and the tube surface. Use a plastic scraper or your finger to spread the glue evenly, avoiding air bubbles that can compromise the seal.
Once the patch is placed, press firmly and hold it in position for a few minutes. Many people underestimate the importance of applying consistent pressure during this initial setting period. This ensures that the adhesive bonds properly and reduces the chance of the patch peeling off later. Afterward, keep the repaired tube undisturbed for the recommended drying time, which can range from a few hours to overnight. Rushing this step, or exposing the repair to water or pressure too soon, can cause the patch to fail.
Additionally, understanding the importance of proper surface preparation can significantly improve the durability of your repair. Testing the patch by slowly inflating the tube and listening or feeling for leaks is a good idea. Remember, a DIY repair can last if done carefully, but common mistakes like improper surface prep, rushing the process, or cutting the patch incorrectly can undermine your efforts. Take your time, follow the steps diligently, and you’ll have a repair that actually holds, saving you the hassle and expense of a replacement.

Foozet Bike Stand,Vertical Bike Rack Garage,Space-Saving Rack with Adjustable for Garage & Apartment, Bike Storage for Indoor Storage (1 pack)
SPACE SAVER CAN WO-WAY PARKING: Our vertical bike stand works well to save your space and keep your...
As an affiliate, we earn on qualifying purchases.
Frequently Asked Questions
How Long Does a Tube Patch Typically Last?
A tube patch typically lasts anywhere from several weeks to a few months, depending on your riding conditions and patch durability expectations. If you ride frequently or in rough terrain, the patch may need replacing sooner. To maximize patch longevity, guarantee proper application and avoid over-inflating your tube. Regularly check the patched area for signs of wear or leaks, and reapply if necessary to keep your tube reliably sealed.
Can I Use a Tube Patch on Any Type of Tube?
You can’t use a tube patch on any type of tube, as compatibility varies. Notably, studies show that proper tire sealant combined with a quality patch can extend tire life by up to 30%. Always check your tube’s material and valve stem type before applying, and consider valve stem replacement if needed. Using the right patch for your specific tube ensures a durable fix, preventing future flats.
Is a Professional Needed to Apply the Patch?
You don’t necessarily need professional assistance for DIY repairs, but it’s recommended if you’re unsure about patching your tube. Applying a patch properly is vital for a reliable fix, and mistakes can lead to further damage or flat tires. If you’re comfortable with basic repairs, you can do it yourself using a tube patch kit. Otherwise, seeking professional assistance guarantees the job’s done correctly and safely, especially for high-pressure or delicate tubes.
What Tools Are Required for Patching a Tube?
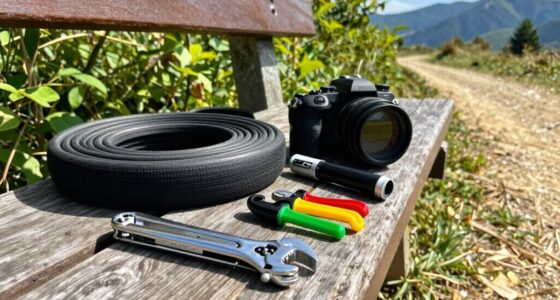
For a DIY repair, you’ll need basic tools like a clean cloth, mild soap, and a patch kit. Tool selection is straightforward—choose a patch specifically designed for your tube size, along with a valve tool if necessary. Make certain you have a pump to test the repair. These tools are simple to use and help ensure your patch holds securely, so you won’t need a professional unless complications arise.
How Do I Prevent Future Punctures After Patching?
To prevent future punctures, focus on valve maintenance and careful handling. Regularly inspect your tube for signs of wear or damage, and always check the valve for proper sealing. Avoid rough terrain and sharp objects, and deflate the tube slightly during transport. Use puncture-resistant tires if possible, and be cautious when inserting or removing the valve. These steps will help you minimize puncture risks and guarantee longer-lasting tube performance.

CXWXC 2-/4-Bike Storage Rack with Basket - Bike Rack Garage for Road, Mountain and Hybrid Bike Garage & Home (For 2 bikes)
【Best Free-Standing Bike Rack】: Whether you’re using your bike for recreation, exercise, or simply commuting, the old two-wheeler...
As an affiliate, we earn on qualifying purchases.
Conclusion
Now that you know how to apply a tube patch, you can patch with confidence, repair with ease, and restore with pride. Follow the steps carefully, use the right materials, and double-check your work. When you take your time, stay attentive, and stay patient, your patch will hold, your ride will roll, and your peace of mind will return. Remember, a proper fix isn’t just a solution—it’s a confidence booster, a safety measure, and a demonstration of your DIY skills.

CyclingDeal Upright Bike Stand Floor - Vertical & Horizontal Bicycle Stand Bicycle Storage - Safe & Secure Bike Storage Rack - for Wheels Sizes up to 29" - Bike Rack Garage Bicycle Rack - Classic
UNIQUE TWO-WAY PARKING DESIGN--ULTIMATE BIKE RACK GARAGE SPACE-SAVER: Looking for a solution to store your bikes neatly and...
As an affiliate, we earn on qualifying purchases.

Bike Nook Bike Stand & Vertical Storage Rack - The Original Vertical Bicycle Floor Stand for Garage Storage, Indoor and Outdoor - Perfect Bike Accessories for Small Spaces with No Drilling
THE ORIGINAL EASY TO USE UPRIGHT BIKE STAND: No more struggling to drill holes, mount or hook bikes...
As an affiliate, we earn on qualifying purchases.